What is ice climbing? Where are the best places to go ice climbing in China? Tips on ice climbing techniques, difficulty, and equipment.
Preface
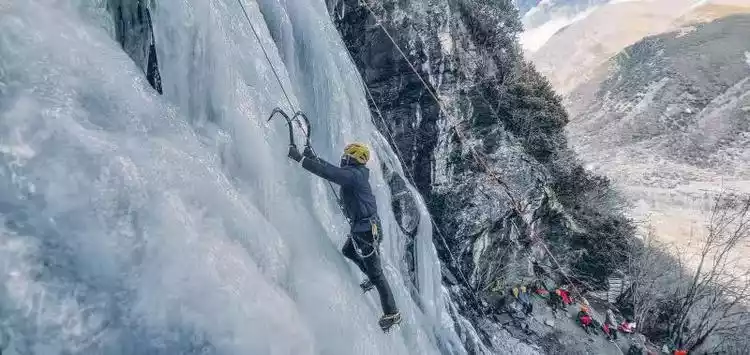
It is the coldest time of the year in winter, with freezing weather and freezing ground. It is the best time for ice climbing. People who love climbing take out their ice axes, crampons and other technical equipment at this time and dance on various ice walls.
Due to the epidemic this year, I was persuaded to turn back after only a few days of climbing. However, my enthusiasm remained undiminished, and I couldn't help but want to write something to talk about my knowledge and understanding of ice climbing.
Since I have only been involved in ice climbing for a short time, my understanding of ice climbing may be insufficient. I welcome corrections from experts. At the same time, I hope more people will get involved in ice climbing and enjoy it together next ice season.
Tips:
Ice climbing is a high-risk outdoor activity that requires the assistance of professional climbing equipment and requires participants to have extremely high professionalism. Therefore, it is recommended that you must choose a professional training institution and follow professional coaches to carry out activities!
Ice climbing
Difficulty
What is ice climbing? What is ice climbing?
Like rock climbing, ice climbing originated from mountaineering. Ice climbing involves climbing ice walls of varying difficulty using specialized climbing equipment, such as ice axes and crampons. The ice walls can be glacial ice from high mountains, seasonal water-flow ice, or artificially poured ice. Regardless of the type of ice, the difficulty rating remains the same. Currently, the most widely accepted rating for ice climbing difficulty is the WI (water ice) system:
WI1: Very gentle ice slope, mainly for easy walking
WI2: Continuous 60-degree ice wall, with some bulges, easy to set up protection
WI3: Continuous 70-degree ice with some 80-90 degree bumps. Good resting areas. Easy and reliable screw placement.
WI4: Continuous 80-degree ice walls, mixed with longer vertical ice walls, with some flat areas for resting. The placement of ice screws requires certain skills.
WI5: Long, steep ice walls, including a pitch-long 85- to 90-degree ice wall with few good resting points, or a short, thin ice wall where ice screw placement is difficult.
WI6: The entire pitch is a near-vertical ice wall with no rest points in the middle; or it is a shorter but more strenuous ice wall than WI5, which requires very high technical skills.
WI7: Similar to the previous level, but the ice is very thin cohesive ice; or it is loosely bonded ice pillars on negative-angle rock; belaying is extremely difficult, of poor quality, or impossible.
WI8 and above: To be discussed.
In addition to water ice formed by seasonal freezing of flowing water, what you encounter more often during mountaineering is alpine ice from permanent glaciers. We use AI (apline ice) to represent alpine ice. It should be noted that the climbing difficulty of ice walls of the same grade is the same, that is, WI3 and AI3 have the same climbing difficulty.
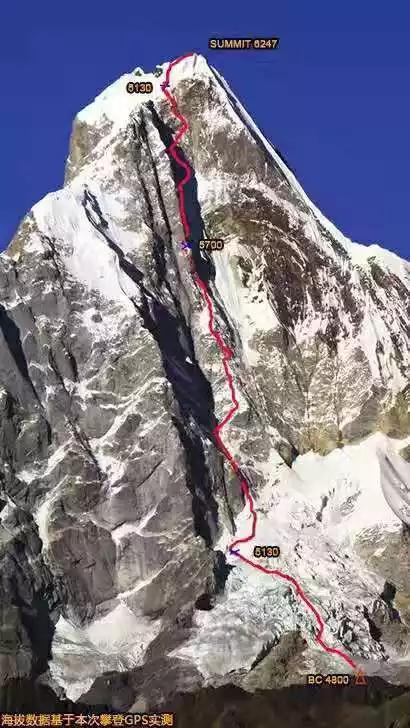
The "Spirit of Freedom" route on the south wall of Yaomei Peak is AI3/M4. AI3 means there are continuous ice walls with a slope of more than 70 degrees on the route.
Unlike rock climbing, ice climbing has a very short season each year and requires more gear. Besides the basics of a helmet, harness, rope, carabiner, quickdraws, and slings, the most notable additions are mountain boots, crampons, ice axes, and ice screws for protection. All equipment must be certified by the UIAA or CE.
equipment
1<Rope>
Since ice walls do not wear ropes like rock walls, ice climbing ropes can be thinner. Of course, as with rock climbing, all our climbing activities still use dynamic ropes with good ductility.
According to my own observation, most people choose 8-9 mm dynamic ropes, double ropes or paired ropes when ice climbing. Single ropes with thicker diameters are rarely used. After choosing the right rope, the matching protector must be compatible with the rope diameter.
In addition, during actual ice climbing, the rope may freeze due to flowing water and low temperature. Choosing a slightly thinner rope will also make it easier to continue climbing, protecting and organizing the rope after the rope freezes.

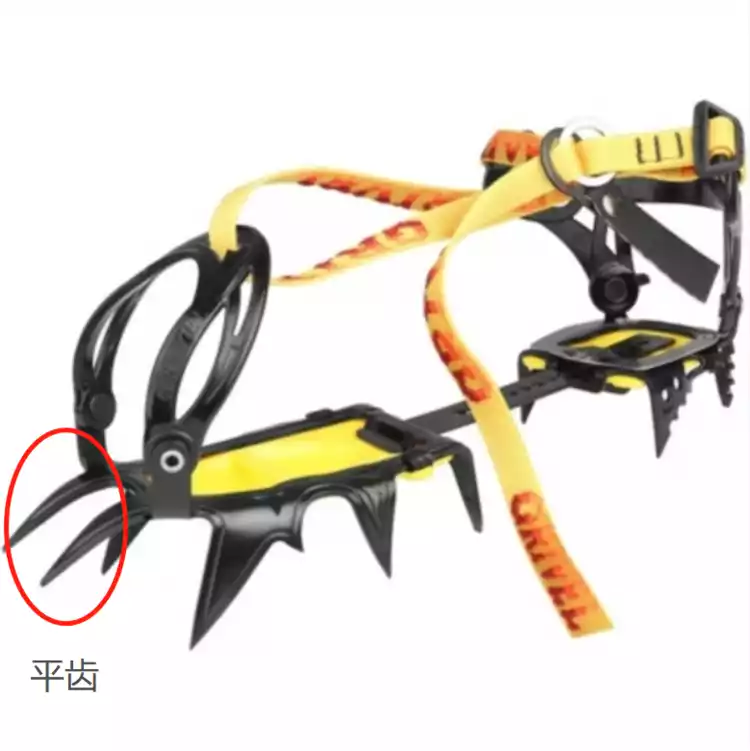
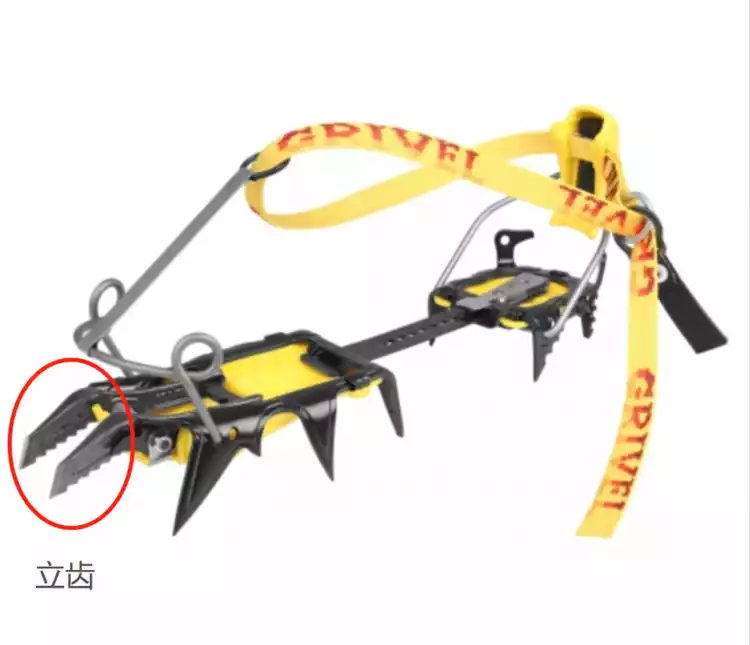
2<Crampons>
You must choose full-claw crampons and use them with mountain boots. The strength of the crampons cannot meet the needs of ice climbing.
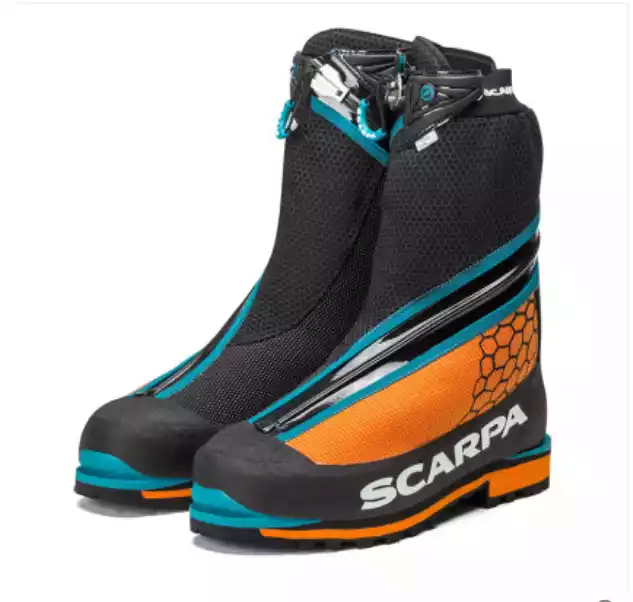
You don't need to choose overly heavy double-layer boots for mountain boots. My la sportiva G5 1.5-layer boots have a good experience, but I feel that if you choose a single-layer boot with less protection, such as scarpa Mont Blanc, it will be lighter and more flexible.
For challenging ice or mixed climbing, vertical crampons are preferred. However, based on my own experience and discussions with other experts, flat crampons can also be used by beginners or on less challenging ice. Flat crampons are suitable for mountaineering and can be used for both mountaineering and ice climbing, making them more economical.
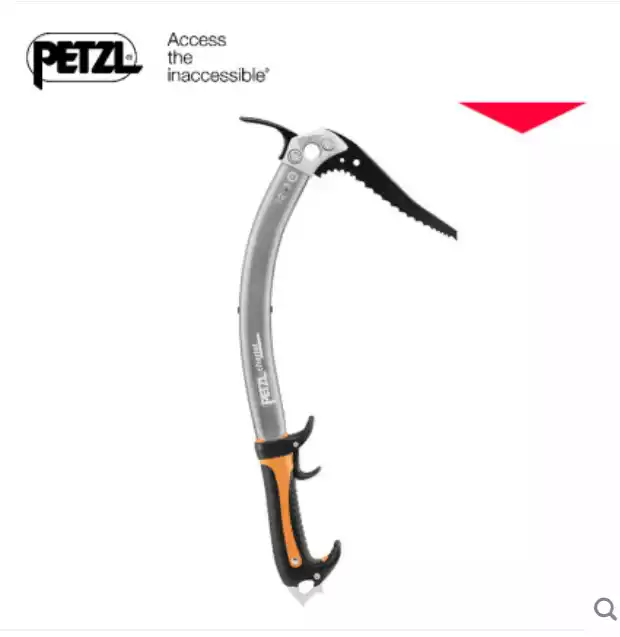
3<Ice Axe>
Ice climbing requires a pair of technical picks.
The technical pick has a built-in curvature, which makes it easier to drive the pick into the ice when climbing. However, the larger the curvature of the ice pick is, the better. Technical picks with extra-large curvatures are more suitable for dry climbing rather than ice climbing. The palm rest under the pick can be used to rest and save arm strength while climbing.
For ice climbers, an ice axe is like a soldier's rifle on the battlefield; it's crucial to be comfortable with it. We recommend trying out different ice axes before choosing one. A good ice axe can last a lifetime, and only requires a replacement tip if it wears out.
I use a Quark ice axe for climbing ropes that I found on a certain website. The weight and feel of this ice axe are more suitable for me. In addition to ice climbing, the Quark ice axe can also be used in actual mountaineering.
I also like the domestically produced Kalenji hollow technology pickaxe, which is light in weight and has an excellent feel when entering the ice.
Everyone has a different experience with the feel of an ice axe. For example, I don't like the Petzl Mic ice axe, which is highly recommended by many experts. My arm strength is not enough to handle its weight. However, according to many experts, Mic performs better on straight walls above WI4.
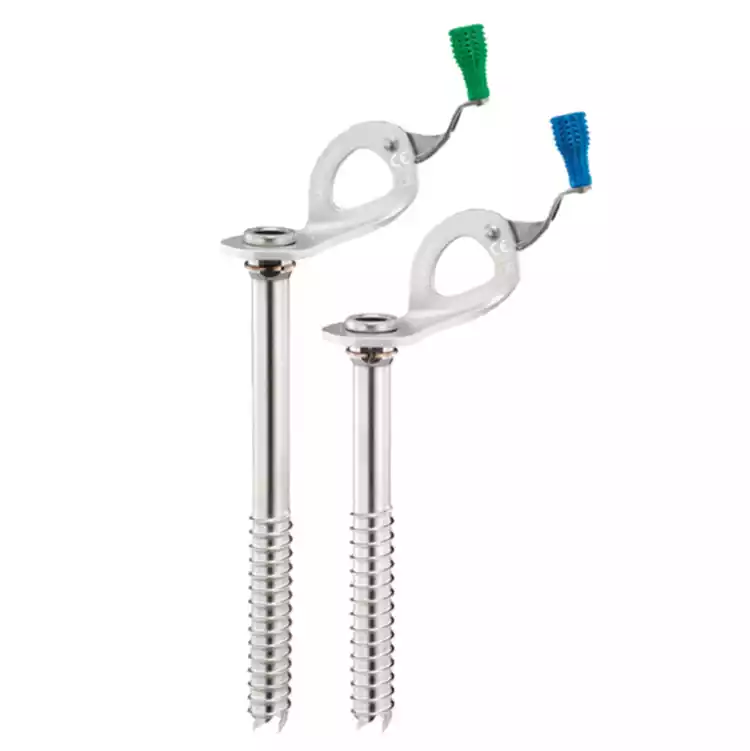
4<Ice Cone>
Ice screws are a safety guarantee for ice climbers. Their structure can be simply understood as a special threaded steel pipe with sharp teeth and a crank to facilitate screwing into the ice surface.
The longer the ice screw, the safer the protection it can provide. However, in actual climbing, we need to choose the appropriate ice screw according to the actual situation and quality of the ice wall. When climbing a more difficult ice wall, there may be no place to insert a long screw.
Generally speaking, we need ice screws longer than 19cm to dig a hole, and at least 16cm to establish a belay station. When inserting a screw during climbing, you should first place the ice axe at a height that will not interfere with your movements. Then, holding the axe in one hand and inserting the screw in the other, you should insert the screw at a height close to your hips. Use your body strength to push the screw in. Once the front teeth of the screw have firmly engaged the ice, turn the crank to fully penetrate the ice.
The sharpness of the front teeth and threads of the ice screw directly affects the speed and efficiency of driving the screw, so we should pay attention to protecting the front teeth and threads of our ice screws. For example, we should avoid hitting rocks when driving the screw, and when clearing the ice inside the ice screw, we should also hit the tail of the ice screw instead of the front teeth.
5<Other Equipment>
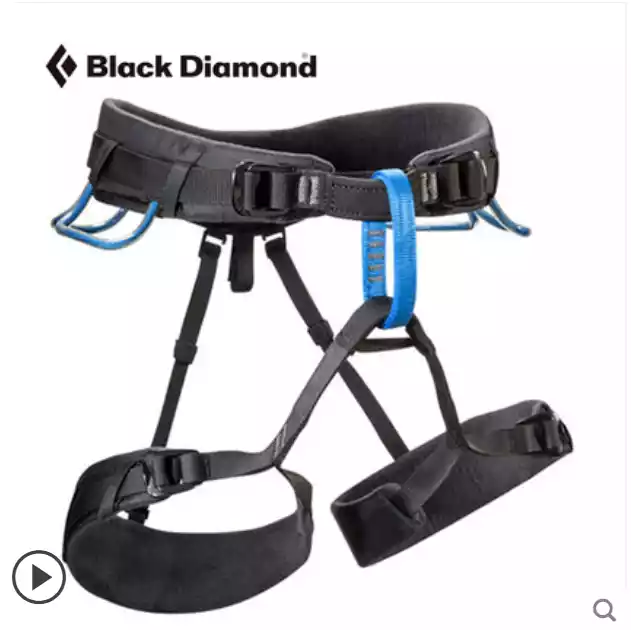
For example, the safety belt needs to be a mountaineering or ice climbing safety belt, which can be equipped with an ice screw hanging ring.
It is best to choose a climbing bag as your backpack, which can be used to attach ice axes, crampons and other equipment.
For ice climbing gloves, you can choose soft shell gloves, which are simply windproof and waterproof. The Kaleshi climbing gloves I use are pretty good. Some experts also recommend choosing thin fleece gloves, which are lighter.
The weather is cold during the ice season, so you need to bring hot water and thick warm clothes in your backpack, such as a large down jacket and thick gloves. You will understand this when you are freezing under the ice wall.

Ice climbing techniques
It is impossible to fully explain the skills required for a professional sport in one article, so here I will only talk about the basic feelings and experiences.
1. Pickaxe
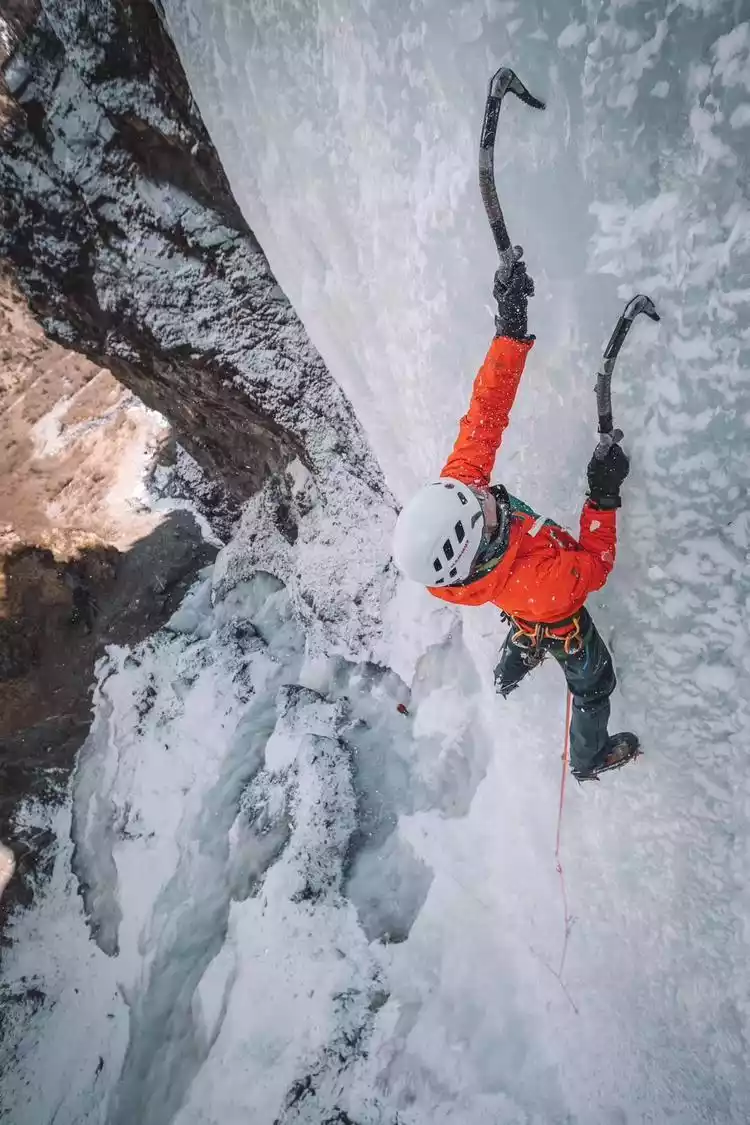
Facing the ice wall, tighten your arms and upper body, keeping your upper and lower arms aligned, and use your upper arms to drive your lower arms. The feeling of hitting the pick is similar to throwing a dart, swinging it out in one swoop. Hold your arms shoulder-width apart and hit the pick as high as possible. The ice pick should be placed on a flat or concave part of the ice wall for greater stability. Avoid placing it on a raised or bulged area, as this will create instability. Once firmly planted, straighten your arms and use your legs to squat, reducing arm force. Minimize locking your arms during climbing to conserve your strength.
When climbing ice hooks, first knock off the unstable ice fragments on the surface, and then hit the relatively stable ice surface, or find a reliable hook point. If a line has been climbed several times, then congratulations, you can save a lot of effort by hooking along the way.
2. Kick the ice
Use the front tines of your crampons to kick into the ice, keeping them perpendicular to the ice. Try to keep your thighs still while kicking, and swing your shins around your thighs to push into the ice. Once the front tines are in contact, lower your shins, allowing the back tines of the crampon to rest on the ice for better support.
The kicking position is slightly wider than the shoulder, which makes it more stable when standing up. Kicking ice and supporting the feet rely more on the calf strength, so the calf will be sore after climbing. You can also do some standing heel raises to exercise the strength of the calf. After all, the strength of the human leg far exceeds that of the arm, and ice climbing is to use the leg strength as much as possible to climb up. Using the front tooth technique can get good support, and there is no need to kick out a hole to stand firmly. Newbies who do not have good ice kicking skills and do not trust crampons will waste a lot of time and energy on the ice kicking step.
3. Parallel pickaxe
One of the basic pickaxe methods, parallel pickaxe refers to the position of the pickaxe, the two ice axes should be at the same height as much as possible, and a slight height difference is allowed. Parallel pickaxe climbing is less efficient but very stable.
4. Parallel feet
One of the basic kicking techniques involves kicking with both feet at roughly the same height. First, lift your foot and kick it slightly outward from your center of gravity. Once the kick is secure, kick it with your other foot at the same height, slightly wider than your shoulders. Once the second kick is secure, adjust the first kick and kick again. Once the adjustment is complete, squat up with your center of gravity close to the ice. Standing with your feet slightly wider than your shoulders, your center of gravity and your feet form an isosceles triangle, providing more stable support.
5. High and low picks and parallel feet
A more efficient climbing method is to first thrust your pickaxe as high as possible when you're firmly planted on the ice and ready to ascend. While holding your other pickaxe stationary, use the parallel foot technique to kick the ice and adjust your center of gravity. Then, thrust your second pickaxe higher than the first, and ascend again using the parallel foot technique, repeating this cycle. This small cycle allows you to ascend further and achieve greater efficiency.
Ice climbing protection and site construction
Any outdoor activity must be conducted safely, so it's worth discussing ice climbing belaying and establishing ice belay stations. It's important to note that the practical application of belaying and establishing stations is far more important than theoretical knowledge, and mastering them requires practical application.
Protect
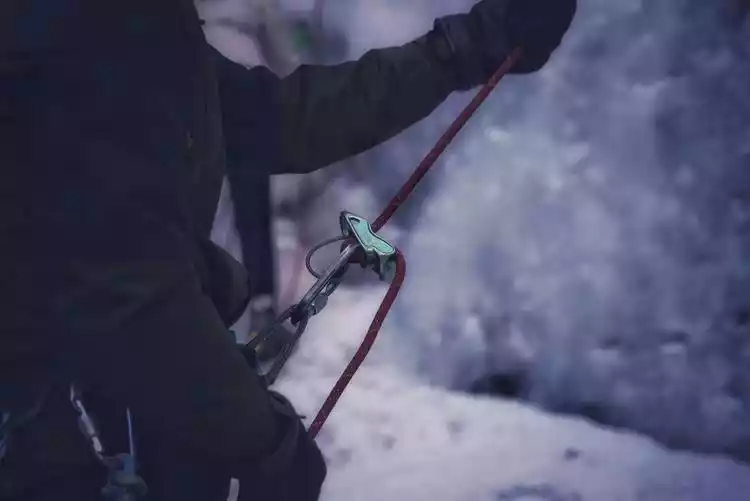
Whether leading with a top rope or tying multiple pitches, belay techniques in ice climbing are similar to those in rock climbing. However, since ice climbing involves using sharp tools and the ice is weaker than rock, falls should be avoided as much as possible when climbing, especially when leading. Falls are a serious concern!!!
Falling is highly likely to result in injury and danger. For ice climbing, tubular belay devices like the ATC or REVERSO should be used. Even when climbing single-pitch lead or top ropes, a GRIGRI should not be used. First, tubular belay devices can still be used if the rope freezes. Second, tubular belay devices can be used for rappelling when removing the anchor. Third, tubular belay devices weigh less than automatic belay devices like the GRIGRI.
Website Building
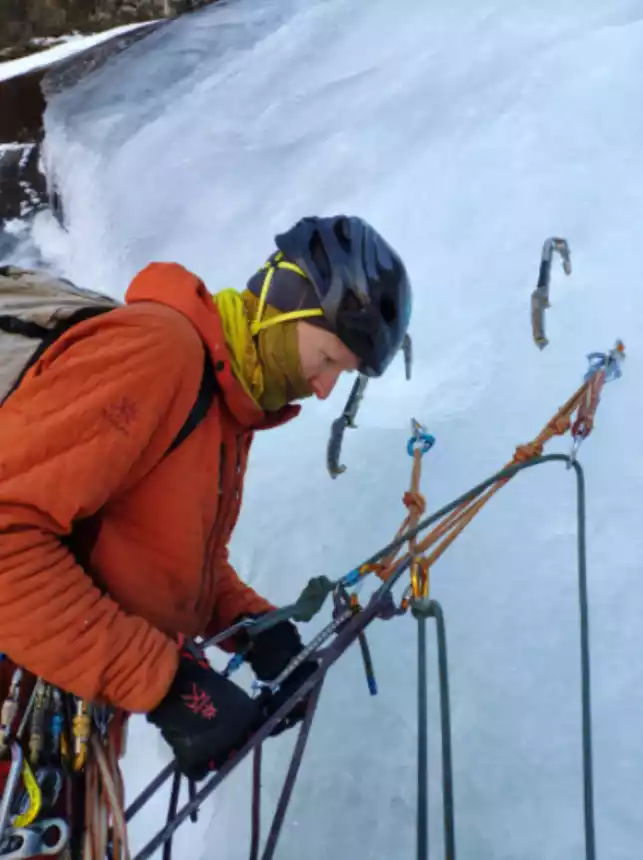
In principle, the longer the ice screws used in a site, the stronger the site. However, in practice, we need to flexibly select the ice screws based on the quality of the ice wall. The principle of site construction is independent backup and balance.
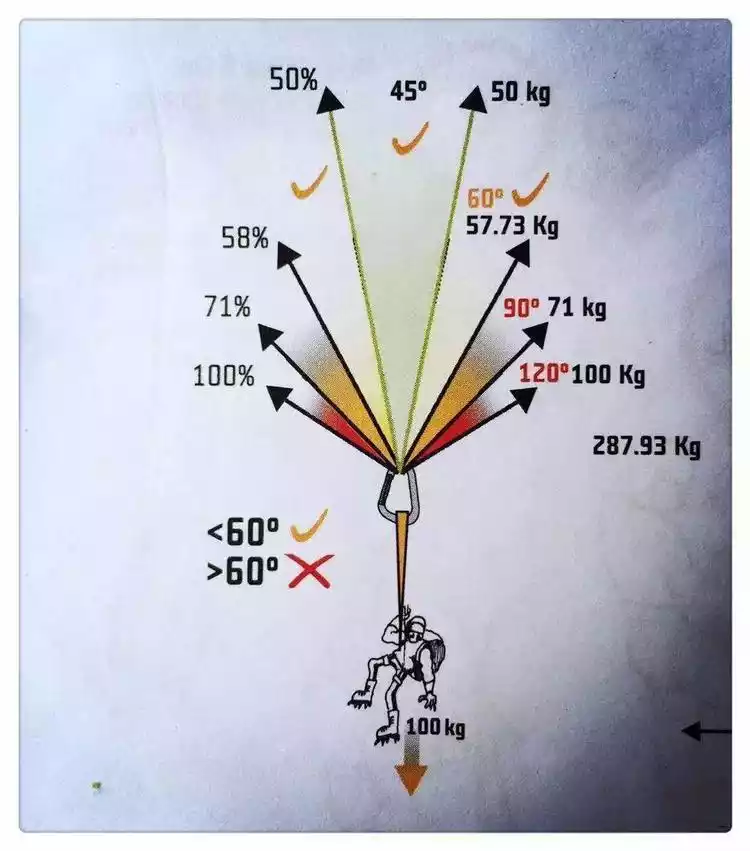
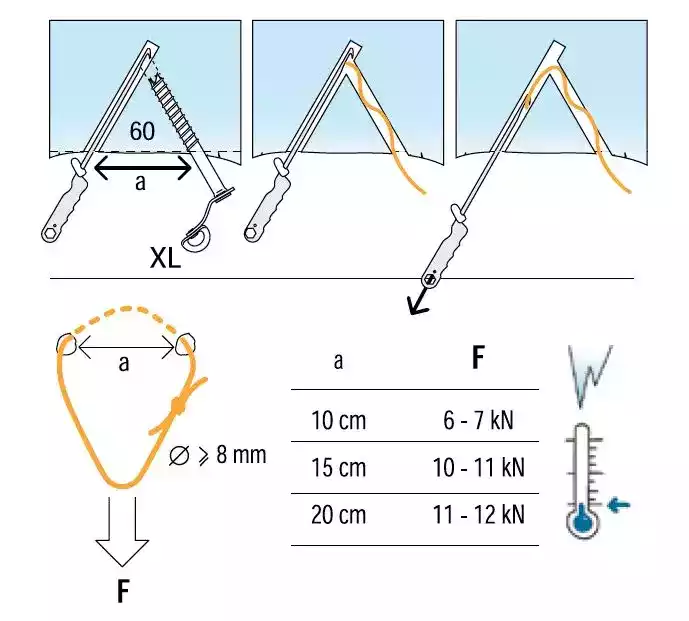
However, unlike rock climbing, there are several points to note when setting up a protection station for ice climbing. First, regardless of whether it is a two-point or three-point protection station, the distance between the ice screws should be greater than 40CM. This is because if an ice screw explodes and falls off, it will affect the ice surface with a radius of about 20CM. In order to prevent the strength of other ice screws in the protection station from being affected when an ice screw falls off, they need to be at least 40CM apart. In actual operation, this is about the distance of a forearm; second, regardless of using a long sling or auxiliary rope to build a station, a single knot needs to be tied at the bottom, so that if one point fails, it will not swing excessively or the impact distance will be too long to affect the strength of other points; third, the angle of the protection station should be between 30-60 degrees, and should not be too large.
When the angle of the anchor reaches 90 degrees, each point receives about 71% of the force. Once the angle reaches 120 degrees, each point will receive 100% of the force, and building multiple anchors becomes meaningless.
When ice climbing, if a line needs to be climbed multiple times, we can set up a three-point protection station, but in a real mountaineering environment, in order to improve climbing efficiency, climbers often set up a two-point protection station.
Ice Cave
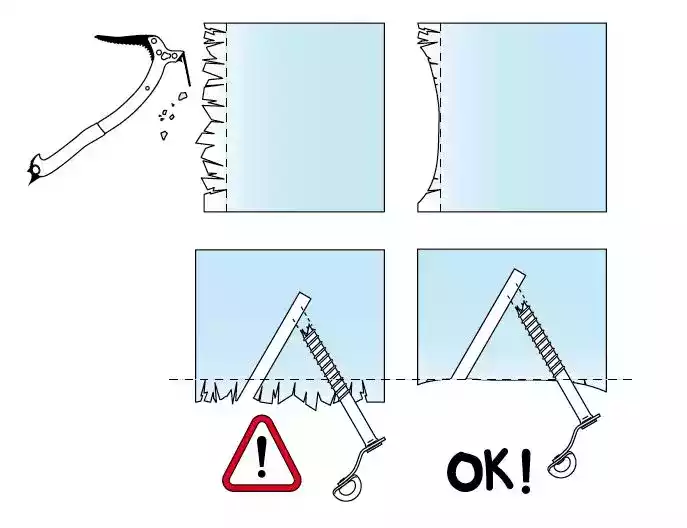
The ice cave we often use is called the Abalakov Ice Cave, invented by former Soviet mountaineers. The ice cave should be set up on a flat and solid ice surface, and the loose ice should be knocked off before digging.
The longer the ice screw is, the stronger the ice hole will be. It is best to use a screw longer than 21CM. If a long screw is not available, at least a screw shorter than 17CM cannot be used.
The strength of the ice hole is greatest when the angle between the holes is an equilateral triangle, but it is generally difficult to make a perfect hole. The best distance between the holes is two fists, but if the ice is good quality, I can accept a distance of one fist as the minimum.
Regarding the way to thread the rope through the ice hole, there seem to be different opinions on whether to thread the main rope directly through the ice hole or to thread the auxiliary rope first and then hang the main rope. In my opinion, for environmental considerations, the main rope should be threaded directly as much as possible. However, once the main rope is frozen in the ice hole, it will be extremely troublesome to pull the rope out, so in actual operations, auxiliary ropes are used more often.
It's important to note that after threading the ice rope, you should test its strength and tie the knot properly, leaving enough space for the rope tail. The ice rope should be at least 1.2 meters long, so a single knot is sufficient. Of course, if you don't mind the trouble, you can also tie a double fisherman's knot or a cross-knot, which will be even stronger.
Suitable places for ice climbing in China
my country is a country rich in mountain resources, but there are not many places with ice climbing resources, because in order to have stable ice walls and a long enough ice season, the winter needs to be long and cold enough.
In northern my country, there are good ice wall resources, such as Taoyuan Valley in Beijing, Taihang Mountains in Henan, Xinjiang, Inner Mongolia and Northeast China. However, I recommend that you choose Shuangqiaogou in Siguniang Mountain as your first choice for ice climbing.
Shuangqiaogoucheck the details
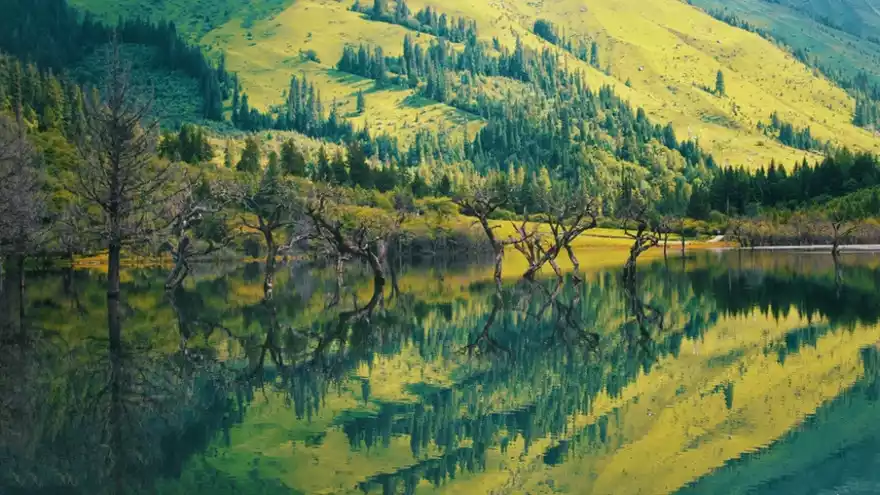
Shuangqiaogou is located in the Siguniang Mountain Scenic Area in Xiaojin County, Sichuan Province. If Balang Mountain is renowned for its botanical beauty, Haizigou for its beautiful waters, and Changpinggou for its local customs and folkways, Shuangqiaogou combines the best of each. From afar, the peaks appear majestic, with withered trees entwined with twisted branches; up close, the water flows gently like a gentle ripple. A poem praises the valley: "Mountains create wonders, trees create scenery; water depicts the clear sky, clouds express emotion. Sunset clouds shroud the road in mist, a thousand miles away, yet no one returns home on a snowy night." This truly captures the allure of the valley's beauty. Major attractions within the valley include Jueqing Valley, Guozhuang Rock, the Ten-Mile Poplar Forest, Bonsai Beach, Seabuckthorn Forest, Sun and Moon Mirror Rock, Five-Colored Mountain, Hunter Peak, Abi Mountain, and Ancient Ape Peak. Shuangqiaogou boasts steep, winding terrain and lush forests. There are birch and cypress forests common in low mountain areas, spruce, fir, redwood in high mountain areas, and even large areas of sea buckthorn, shrubs and larch. In spring and autumn, the valley is full of colorful and spectacular scenery.
Recommended months: May-October
4450 comments 2727 visits
Advantages of Shuangqiaogou:
1. Close enough to Chengdu
It takes about 3 and a half hours to drive there, and the scenic area is well developed with roads all the way, making it easy to get to the ice wall.
2. The climbing atmosphere is good
The Sichuan Mountaineering Association is the most open and humane mountaineering association in my country. The Siguniang Mountain Scenic Area also provides certain support to ice climbing enthusiasts in terms of policies. Shuangqiaogou is well-known. In winter, mountaineers from all over the country and even the world will gather in Shuangqiaogou for climbing training during the ice season.
3. Rich resources
There are a large number of snow-capped glaciers in Shuangqiaogou of Siguniang Mountain. The meltwater forms waterfalls in summer and freezes into ice walls of varying difficulty in winter. From novice to expert, everyone can find an ice wall of appropriate difficulty, such as the five colors of WI3, the wings of WI4, and the stairs to heaven of WI5. The most difficult ice wall in Shuangqiaogou is the dragon wall, which is rated at WI6.
At the same time, Mount Siguniang is also a very famous scenic spot. After climbing, you can bask in the sun and admire the colorful peaks in the valley, and imagine that one day you can also move around on these legendary peaks.
It should be noted that although the peaks in Shuangqiaogou are not too high, they are very difficult to climb. Climbing is risky and requires caution.
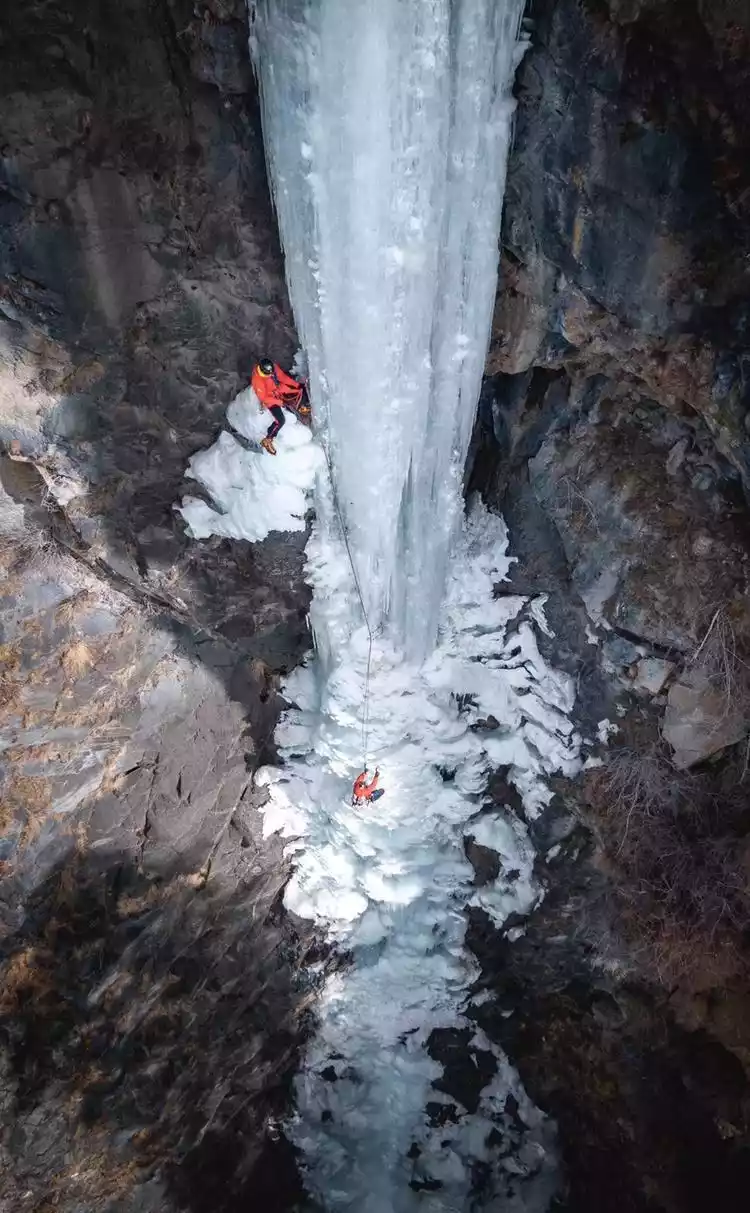
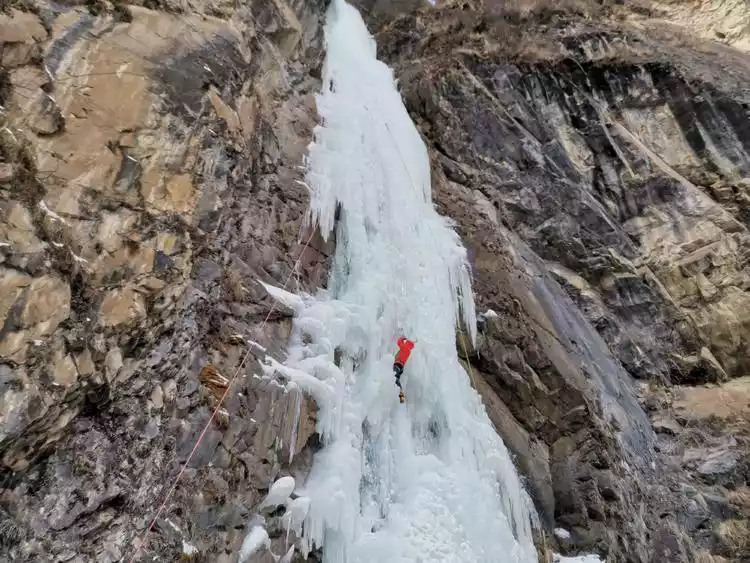
("Stairway to Heaven" WI5, photo by A Zuo)
Conclusion
Getting started with ice climbing is actually easier than rock climbing, which depends on the natural conditions of the ice wall.
First, even on the strongest ice, a metal crampon or ice axe will only leave a fist-sized dent. Unlike rock climbing, which involves a variety of hand and foot holds and techniques, ice climbing is more about mechanical repetition. A beginner can master the basics after just three to five days, and can even attempt to climb a WI4 ice wall with top rope protection. But can you reach 5.10 in just three to five days of rock climbing?
Secondly, the ice wall needs to be attached to the rock wall, and it is difficult to form a large and continuous elevation angle without rest. In other words, the absolute strength endurance and climbing skills required are lower than rock climbing.
I know that some people with a good rock climbing background can reach WI4 ice walls after two seasons of climbing. Can you climb 5.11 after two months of rock climbing? The essence of ice climbing lies more in the mentality and accumulation of experience. Climb more and more different ice walls.
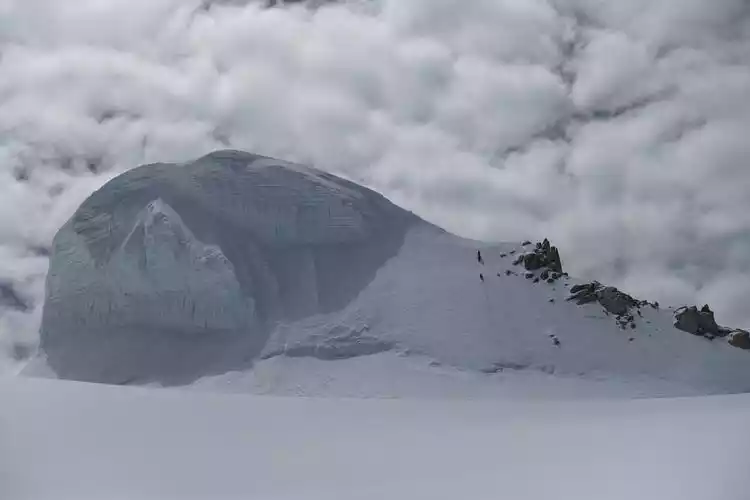
The large ice wall before the summit of Queer Mountain, AI2. For climbing enthusiasts, the true joy of mountaineering lies not in walking on snow slopes, but in climbing various steep and exposed terrains. For Chinese mountaineering enthusiasts, climbing snow-capped mountains is essential. Snow slopes are the basic terrain of snow-capped mountains, and only by learning ice climbing can you master them with ease.
At the same time, I think that when learning ice climbing, people should not be limited to ice climbing, but more should improve their ability to pass through ice and snow terrain, such as walking on ice slopes, sliding, braking, cracks, and forming groups, etc., so as to truly improve their mountaineering level.
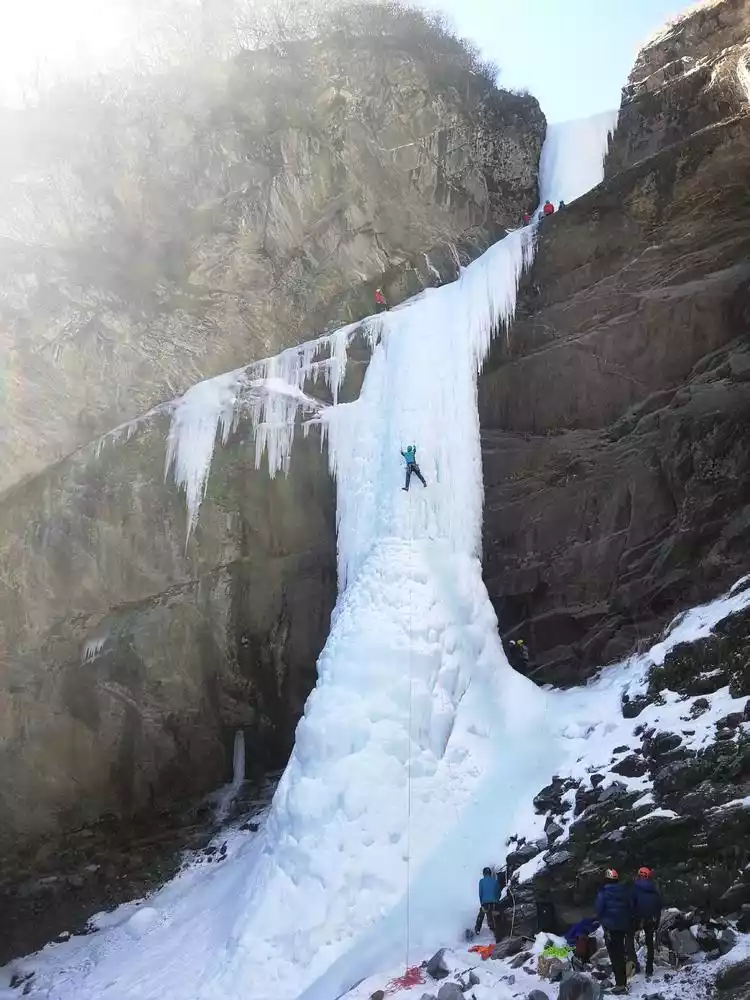
(2019 "Wings", WI4)