Besties' Photo Spot! Stunning Flash Photography During Sunset Blue Hour
7 Days Hotel Premium
by 7天优品Premium酒店(许昌禹州汽车站胖东来店)
Sep 13, 2025
by 7天优品Premium酒店(许昌禹州汽车站胖东来店)
Sep 13, 2025

Taking photos with your bestie often ends in disappointment: crowded photo spots, poor lighting making your face look dull, or spending hours without a single post-worthy shot—until we stayed at the 7 Days Premium Hotel (Xuchang Yuzhou Bus Station, Pangdonglai branch). This hotel unlocked the freedom of "bestie photo sessions": just a 10-minute walk to a sunset blue hour photo spot, where a simple flash photo on your phone makes your skin glow, the sky turns a soft blue-purple, and even your hair shines. The photo success rate skyrockets, and you can post a nine-grid collage without any editing. It's truly a "photo haven" for bestie trips!
Hotel's "Photo-Friendly" Features: Get Ready Without the Rush
In the past, getting ready for photos with my bestie in hotel rooms was always chaotic: tiny mirrors that made makeup application a struggle, dim lighting that led to crooked lipstick, and nowhere to hang outfits. But this hotel's room is practically designed for "photo prep."
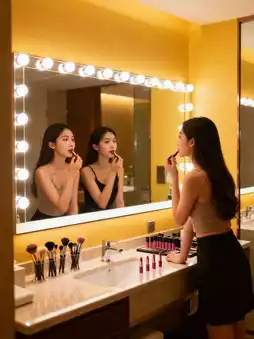
First, there's the "makeup-friendly zone": the bathroom features a 1.8-meter-wide full-length mirror surrounded by adjustable ring lights (with warm and cool settings). You can clearly see every detail while applying foundation or eyeshadow, no need to use your phone's flashlight for extra light. My bestie and I did our "blue hour makeup" together in front of the mirror: light apricot eyeshadow, soft pink blush, and a flattering mauve lipstick. We even joked about each other's eyeliner mishaps—it was so much better than squeezing in front of a tiny mirror in a small guesthouse.
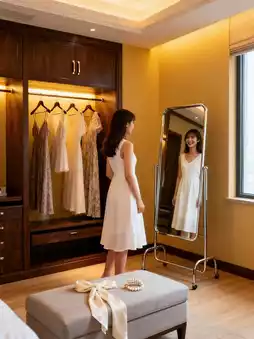
The room also has a "wardrobe corner": the closet comes with four hanging rods (enough for our five photo outfits), a foldable full-length mirror for trying on dresses, and a bench at the foot of the bed for bags and hats, so nothing ends up on the floor. The most thoughtful touch? The front desk lent us two pairs of pearl hair clips and a light beige scarf for free when they heard we were taking photos. These accessories added a soft glow to our blue hour shots and became the "finishing touch" in our photos.
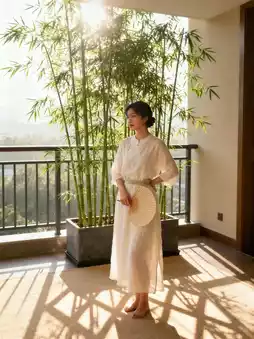
Before heading out, we even did a "test shoot" on the balcony: the west-facing balcony catches the last rays of sunset around 5 PM. We tried using the phone's flash, and the photos came out with bright skin tones and clear dress details. This way, we knew the lighting in advance and could start shooting right away at the photo spot without wasting time.
10-Minute Walk to Two Blue Hour Photo Spots
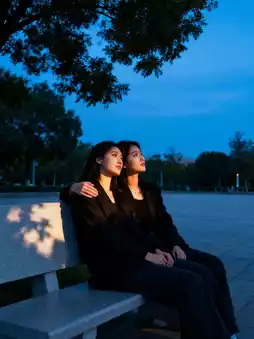
No need to drive far—just a short walk from the hotel takes you to two "scenic and uncrowded" blue hour photo spots. During the half-hour after sunset, when the sky turns blue-purple, every flash photo becomes a "social media hit."
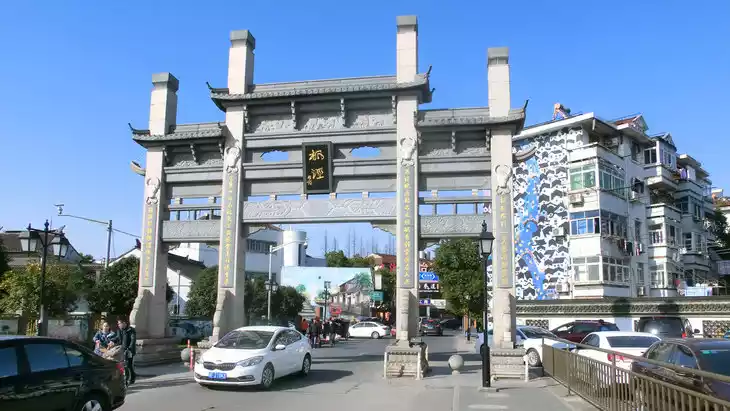
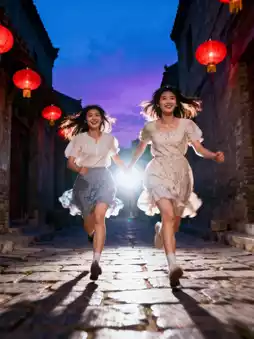
Photo Spot 1: Yuzhou Old Street's Stone Path
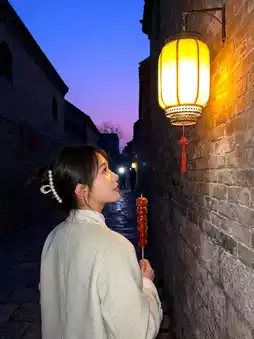
An 8-minute walk from the hotel takes you to Yuzhou Old Street. Around 6 PM, most tourists have left, leaving only the warm yellow lanterns lighting up. The last rays of sunlight tint the stone path a soft gold, and then the sky gradually shifts to light blue and finally purple-blue—the blue hour has arrived!
We chose a "corner spot" in the middle of the old street for our photos: my bestie stood on the stone path with her back to the lanterns, while I held the phone (flash on) about 1 meter away and took a slightly upward shot. The flash perfectly illuminated her face, making her skin glow without looking oily. The background featured warm yellow lanterns and a blue-purple sky, creating a stunning contrast. Even the pearl hair clip in her hair sparkled softly.
We also tried "interactive poses": holding hands and walking down the stone path while a friend captured candid shots with the flash on "constant light" mode. The wind lifted our dress hems, filling the photos with the joy of "besties having fun together." Leaning against the old street's wooden doors, each holding a candied hawthorn stick (bought from a street vendor for 5 yuan each), we smiled at the camera. The red of the candied hawthorn complemented the blue hour sky, adding depth to the composition.
Photo Spot 2: Small Square Near Pangdonglai
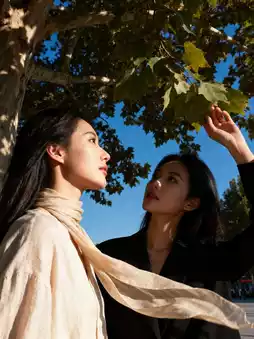
If you don't feel like going to the old street, a 5-minute walk from the hotel takes you to a small square near Pangdonglai, where you can also capture stunning blue hour photos. The square features large plane trees casting shadows on the lawn, with light gray benches that perfectly match the blue hour sky.
Our favorite was the "bench photo technique": sitting close together on a bench, one of us resting her head on the other's shoulder, with the flash providing side lighting to avoid the stiff look of direct frontal lighting. The resulting photos had a blue-purple sky as the backdrop, tree shadows falling on us, and even the texture of our clothes clearly visible. My bestie said, "This one looks like a scene from a Korean drama."
We also took "dynamic shots": running lightly across the square with the light beige scarf (borrowed from the hotel), while a friend used burst mode on the phone. The flash captured the scarf mid-air, creating lively, natural photos without stiff poses. Standing by the plane trees, touching the leaves with a side profile to the camera, the flash highlighted the contours of our faces, even making our jawlines pop. My bestie exclaimed, "This one has to be my new profile picture."
Flash Photography Tips: 3 Tricks for Beginners to Nail Every Shot
Using flash for photos often leads to issues: overexposed faces, pitch-black backgrounds, or red-eye. But after experimenting during the blue hour, we discovered three beginner-friendly tricks for consistently great shots.
Tip 1: Control Flash Distance—Not Too Close or Too Far
If the flash is too close (less than 50 cm), the face will be overexposed and pale; too far (more than 1.5 meters), and the lighting won't be enough, leaving the face dark. After many tries, we found that "about 1 meter" is ideal: hold the phone at chest height, aim the flash at the chest area (not directly at the face), and the light will naturally spread to the face, making the skin glow naturally and even hiding minor imperfections.
Tip 2: Choose "Light Colors + Small Highlights" for Outfits
The blue hour sky is cool-toned, so dark clothes can blend into the background. Light colors (white, light blue, light pink) stand out more in photos! My bestie and I wore a white dress and a light blue shirt, respectively, paired with small highlights—she wore pearl hair clips, and I tied a light beige scarf. These small accessories reflect light under the flash, adding interest to the photos.
Tip 3: Avoid "Direct Flash"—Try Side or Angled Lighting
Direct flash often causes red-eye and makes the face look flat. We switched to "side lighting" or "angled lighting": for front-facing shots, position the flash at a 45-degree angle from the left or right front, creating a more dimensional look. For side profile shots, light from the opposite side to enhance the contours and avoid red-eye.
After an hour of shooting, we had over 100 photos on our phones, most of which needed little to no editing. A slight brightness adjustment (to emphasize the blue hour sky) was enough to make them post-ready. My bestie posted her photos, and friends immediately asked, "Where did you take these? They're amazing."
Bestie Details: Relaxing Back at the Hotel After Photos
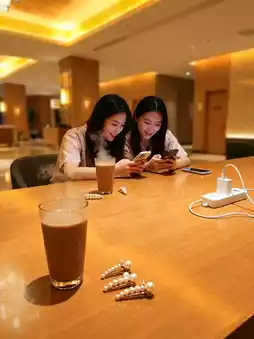
After a tiring photo session, it was just a short walk back to the hotel—no need to rush for transportation. Once back, we headed straight to the first-floor "lounge area," ordered two hot milk teas (the hotel can help order delivery directly to the lounge), and sat together selecting photos without crowding around the small desk in the room.
The lounge has large tables and charging outlets, so we could charge our phones while editing photos and joking about them: "You look so silly in this one," "I didn't even open my eyes in that one." The atmosphere was super relaxed. For solo editing, the room's desk was also comfortable, with an adjustable lamp that was easy on the eyes even after long phone use.
In the evening, we took "indoor ambiance photos" on the room's balcony: with the small balcony light on, we took mirror selfies using the flash, with the hotel's night view as the background. My bestie even used the room's Jun porcelain cup as a prop for a "holding a cup while gazing at the night view" shot, which turned out artsy and soft.
Bestie Photo Tips
- Blue hour typically occurs between 6:00–6:30 PM (summer). Arrive at the photo spot 10 minutes early to find the best position and avoid missing the perfect timing.
- Borrow photo props (pearl hair clips, scarves) from the hotel front desk in advance—they're free and look great in photos, saving you the trouble of bringing your own.
- Wear light-colored outfits with small accessories (necklaces, hair clips) for added highlights under the flash.
- After returning from the photo spot, use the hotel's makeup remover pads (provided in the room) to remove makeup and avoid sleeping with it on.
- For indoor ambiance shots, use the room's balcony light and flash for an artsy vibe.
This trip to Yuzhou with my bestie was a delightful surprise: "no long drives, no overthinking, just stunning blue hour photos." The photo-friendly details of the 7 Days Premium Hotel, combined with the nearby photo spots, made our bestie trip both relaxing and Instagram-worthy. No more exhausting photo sessions!
If you're looking for a "photo freedom" trip with your bestie, don't hesitate—give this place a try. The blue hour sky, the smiles under the flash, and the carefree moments with your bestie will become your most cherished memories.
Post by 7天优品Premium酒店(许昌禹州汽车站胖东来店) | Sep 13, 2025